Home     About Me     Recipes     Blogs I Read     Contact

Friday, September 30, 2011

Mango Avocado Salsa


Can you believe we're already coming up to week four of the football season?  It's been an exciting year so far.  Some players have had a great three weeks:  Cam Newton, the rookie quarterback, has made an pretty impressive start to his first NFL season, and Tom Brady has been playing amazing!  However, there's been letdowns as well; specifically, the fact that Peyton Manning (arguably the best quarterback in the NFL) probably won't play this season because of his neck injury.  

After really watching football for the last few years, I've gotten familiar with players and teams, and established by my own terms who I like and dislike.
I like to watch San Diego Chargers (#1), Baltimore Ravens, Green Bay Packers, and Minnesota Vikings.
I dislike Pittsburgh Steelers, Miami Dolphins, and the New Orleans Saints.
Why?...I have my reasons.  Not good reasons, but they're reasons.  I'll spare you the details for now.

After such a great start, I'm definitely looking forward to watching more exciting games throughout the rest of the season!  AND let's hope my fantasy team starts playing better (currently 1-2).  

My boyfriend and I spent the last weekend watching football while devouring a new salsa recipe I tried.  I can't wait to share this recipe with you because it is the perfect accompaniment to Sunday football.  But, even if you're not a football fan, there's still no reason why you can't enjoy this tasty snack.  This mango-avocado salsa is one of the most addicting salsa recipes you will find.  I guarantee it.  It doesn't even last a day in our fridge because it's so good!  My mom actually gave this recipe to me about a month ago, because she and my dad loved it so much.  Not only do the sweetness of the mango and freshness of the avocado blend together perfectly, but the variety of colors they give to the salsa makes it look so appetizing!  The best part is, it is SO easy to throw together.  Please give this recipe a try; just be prepared to make extra batches, because it won't last long.


Mango Avocado Salsa

Ingredients:
1 mango, peeled, seeded, and diced
1 avocado, peeled, pitted, and diced
4 medium tomatoes, diced
1 jalapeno pepper, seeded and minced
 1/2 cup chopped, fresh cilantro
3 cloves garlic, minced
1 tsp salt
2 Tbsp fresh lime juice
1/4 cup chopped red onion
3 Tbsp olive oil

Directions:
In a medium bowl, combine the mango, avocado, tomatoes, jalapeno, cilantro, and garlic.  Stir in the salt, lime juice, red onion, and olive oil.  To blend the flavors, refrigerate for 30 minutes before serving.  
Serve with tortilla chips or use on white fish, such as tilapia.

Tuesday, September 13, 2011

Double Chocolate Raspberry Cupcakes


 Before I begin, I have to admit, I like chocolate but have never been a self-proclaimed chocolate lover, like others you may know.  In fact, I remember actually saying the words "I don't like chocolate" when I was younger.  I always gravitated toward lighter flavors, such as vanilla or strawberry, and used to shy away from the dark, rich flavor of chocolate.  No chocolate cake, chocolate donuts, or even chocolate shakes could sway me.  It was all, according to me, off limits for my tastebuds.  However, as I grew up and opened up to new flavors and foods, I finally learned to appreciate the sweet goodness of chocolate.  It has such a strong, bold flavor that can be delicious on its own, but can also be a great base for so many other flavor combinations.  I'm glad I finally came around and learned to appreciate chocolate...honestly, I don't know what I was thinking so many years ago.
When I saw this cupcake recipe on Annie's Eats, I immediately knew that I had to try it.  It consists of a rich chocolate cake, filled with homemade raspberry filling, topped with chocolate ganache and a ganache-filled raspberry.  The sweet, tart flavor of raspberries sounded perfect for the deep flavors of the chocolate cake...and really, lets face it; anything with chocolate ganache tastes good.  After making these cupcakes, I took some to my boyfriend's work, and some to my work, and this cupcake got plenty of rave reviews.  I absolutely loved these cupcakes, but since I'm not a lifelong "choc-o-holic," don't take my word for it, but trust the opinions of the others who praised this cupcake recipe.  Go make these cupcakes!


Double Chocolate Raspberry Cupcakes
Print this recipe

Original recipe from Annie's Eats
Yield:  24-28 cupcakes

Ingredients:
For the cupcakes:
3 oz. semisweet chocolate, finely chopped
1 1/2 cups hot brewed coffee
3 cups sugar
2 1/2 cups all purpose flour
1 1/2 cups unsweetened cocoa powder
2 tsp baking soda
3/4 tsp baking powder
1 1/4 tsp salt
3 large eggs
3/4 cup vegetable oil
1 1/2 cups buttermilk
3/4 tsp vanilla extract

For the raspberry filling:
1 (12 oz) bag frozen raspberries, thawed
1/4 cup sugar
1 Tbsp cornstarch

For the ganache frosting:
12 oz. bittersweet or semisweet chocolate, finely chopped (I used semisweet)
3/4 cup heavy cream
1 1/2 Tbsp sugar
1 1/2 Tbsp corn syrup
3 Tbsp unsalted butter, at room temperature

Directions:
For the cupcakes:
Preheat the over to 350 degrees F.  Line cupcake pans with paper liners.  Place the chopped chocolate in a medium bowl; add the hot coffee and let stand a minute or two, then whisk until the chocolate is melted and the mixture is smooth.

In a large mixing bowl, combine the sugar, flour, cocoa powder, baking soda, baking powder, and salt.  In the bowl of an electric mixer beat the eggs on medium-high speed until slightly thickened and pale yellow.  Slowly add the oil, buttermilk, vanilla, and melted chocolate mixture to the eggs, mixing until well blended.  Add the dry ingredients and beat on medium-low speed just until incorporated.

Divide the batter evenly between the prepared cupcake liners, filling each about 3/4 of the way full.  Bake 18-20 minutes or until a toothpick inserted in the center comes out clean.  Allow to cool in the pan 5-10 minutes, then transfer to a wire rack to cool completely.

To make the raspberry filling:
Puree the raspberries in a blender or food processor.  Strain the mixture through a fine mesh sieve into a saucepan to remove the seeds.  Whisk in the sugar and cornstarch, and heat, stirring frequently until the mixture boils.  Once it has thickened, remove the pan from the heat.  Chill before using.

To make the ganache:
Add the chopped chocolate to a medium heatproof bowl.  In a saucepan, combine the cream, corn syrup, and sugar.  Heat until just boiling.  Immediately pour the mixture over the chopped chocolate and let stand a few minutes to melt.  Whisk in small circular motions until the mixture is smooth and blended, then whisk in the butter 1 tablespoon at a time until completely incorporated.  Let the mixture stand at room temperature to thicken slightly, so it can be piped or spread.

To assemble the cupcakes:
Place the raspberry filling in a pastry bag, fitted with an injection tip or just a plain circular tip.  Stick the tip into the top of each cupcake and pipe a few teaspoons of filling into each cupcake.  Spread the ganache over the tops of the cupcakes.  If desired, pipe excess ganache inside fresh raspberries and place on top of the frosted cupcakes (do this before the frosting sets).  Allow to set completely before serving.

Sunday, September 11, 2011

Fried Bocconcini with Spicy Tomato & Garlic Chutney


Happy First Day of Sunday Football!

I never used to be a huge fan of football until I started dating Tony, who is a huge Chargers fan (which I guess makes me a fan by default, since I hate the Raiders and 49ers anyway).  I've watched the games with him over the past three years, getting familiar with the players and teams, and followed his fantasy football teams every season...all FOUR of them!  Crazy, right?  Well, this year is my first season of having a fantasy team of my own, and although I'm not expecting to win the whole thing, hopefully I'll be capable of at least staying out of last place! 

Even though I now understand the game and am familiar with most of the players, I mainly look forward to football season because it's a great time to get together with friends, crack a beer, and enjoy great food.  There are so many delicious game day appetizers to enjoy, like this one.  I discovered this recipe at the same time that I discovered the Twice Baked Potato recipe, which I wrote about a few posts back.  This recipe was also featured on the "Football Weekend" episode of Giada at Home, on Food Network.  

Although I love fried mozzarella, what really convinced me to try this recipe was the tomato chutney.  I am a HUGE fan of tomato chutney and prefer it over typical dipping sauces such as marinara sauce.  I think chutney has so much more depth and flavor, and this chutney recipe certainly did!  I was a little hesitant about the strength of the ginger flavor because it has such a strong smell when chopping the fresh root, but once it's cooked with the rest of the ingredients, the flavor intensity is just right.  It blends perfectly with the tomatoes and spices, and none of the flavors compete with one another.  Best of all, the house smelled AMAZING while it was cooking!  Definitely give this recipe a try--if not the mozzarella balls, then at least try out this chutney.  You'll never want to dip anything in simple marinara sauce again!


Deep Fried Bocconcini with Spicy Tomato and Garlic Chutney
Print this recipe

Recipe from Giada at Home - "Football Weekend" episode
Prep time:  18 minutes
Cook time:  58 minutes
Difficulty:  Easy
Yield:  6-8 servings (Or 2, if you eat like Tony and I! LOL)

Ingredients:
For the bocconcini:
16 (1-inch diameter) balls bocconcini mozzarella cheese
2 cups all purpose flour
Kosher salt and freshly ground black pepper
4 eggs, beaten
3 cups seasoned Italian style breadcrumbs
Vegetable oil, for frying

For the chutney:
8 cloves of garlic
1 (1-inch) piece fresh ginger, peeled and coarsely chopped
1/4 tsp kosher salt, plus more for seasoning
1/2 cup red wine vinegar
1/4 cup sugar
2 Tbsp extra virgin olive oil
1 tsp ground cumin
1/4 tsp cayenne pepper
1 (15 oz) can diced tomatoes

Directions:
For the bocconcini:
Drain the bocconcini and pat dry with paper towels.  Put on a paper towel lined plate and allow to dry in the refrigerator for 2 hours.  Put the flour in a medium bowl and season with salt and pepper.  Put the eggs in a second medium bowl and the bread crumbs in a third medium bowl.  Coat the bocconcini in flour and then dip into the eggs.  Roll the bocconcini in the bread crumbs until coated.  Dip the coated bocconcini, again, in the eggs and then coat with bread crumbs.  Freeze the breaded bocconcini for 20 minutes.

For the chutney:
In a blender, combine the garlic, ginger, 1/4 tsp salt, red wine vinegar, sugar, olive oil, cumin, and cayenne pepper.  Blend until smooth.  Pour into a medium, heavy-bottomed saucepan and add the tomatoes.  Bring the mixture to a boil, over high heat, then reduce the heat and simmer, stirring occasionally, until most of the liquid has evaporated and the mixture is thick, about 45-55 minutes.  Using the back of a wooden spoon, gently break up the tomatoes as they begin to soften during cooking.  Season with salt, to taste.  Let the chutney cool to room temperature, about 35 minutes.  Place in a serving bowl.

In a large heavy-bottomed saucepan, pour in enough oil to fill the pan about a third of the way.  Heat over medium heat until a deep-frying thermometer reaches 375 degrees.  In batches, fry the bocconcini until golden brown, about 15-20 seconds.  Drain on paper towels.

Arrange the bocconcini on a platter and serve the chutney alongside as an accompaniment.

Notes:

  • Despite the title, "Spicy Tomato Chutney," it really isn't very spicy.  The 1/4 tsp of cayenne pepper barely gives it a hint of spiciness; I might add more next time.
  • I couldn't find 1-inch balls of bocconcini so I bought a tub of four 2-inch balls, and after draining, just cut each into fourths. 
  • Instead of using regular bread crumbs, I used panko breadcrumbs and seasoned it myself:  about 1 tsp of basil, oregano, onion powder, garlic powder, and 2 tsp of parsley and parmesan cheese.
  • The order of the recipe is a little misleading--I drained and dried the bocconcini in the fridge, then a little after an hour later, started on the chutney.  This way, while the chutney is cooking, the bocconcini will be ready for breading, and then the chutney can finish cooking while the mozzarella balls are in the freezer.  By the time the mozzarella balls are taken out of the freezer and fried, the chutney should be cooled and ready for serving.
  • I don't have a deep-frying thermometer.  I just used my own judgement by testing the frying oil.  Throw a small piece of bread in the hot oil--if it starts to bubble as soon as it hits the oil, the oil is ready. 


Saturday, September 10, 2011

Peach Cupcakes


Anyone who knows me well knows that my favorite fruit is the peach.  I always look forward to the summer, mainly because I know that peach season is nearing.  However, it's a little tough to find the perfect peach.  I always used have trouble finding the perfect median between underripe and overripe.  I would sometimes misjudge a peach with a soft feel to mean that it will be sweet, when in fact, it was...just...mushy.  So then I'd pick one a little firmer, and it would end up too crisp, like I was biting into an apple!  


BUT after my years and years of experience, I think I can proudly say I'm an expert when it comes to peaches!  I've learned the proper combination of firmness, color, and smell that a peach needs to have in its prime state.  Now, in case you haven't developed this "skill" yet, no need to worry, just aim for an overripe peach.  While an overripe peach may not be the most enjoyable to eat fresh, it is perfect for baking!  Since I've picked many overripe peaches throughout the years, I've experimented with a lot of peach recipes.  However, this peach cupcake recipe that I recently discovered is probably one of my favorite recipes of all time!  


I found this recipe while browsing through my newest addiction:  Pinterest (a fairly new website that allows you to find and save great ideas/recipes/websites, and is being used by most of the food/craft blogging community).  Because it had peaches, it immediately caught my eye.  As I followed the link, I discovered that it not only had peaches, but a cream cheese and peach frosting!  This sounded like a prefect combination, and despite my high expectations, this recipe did not disappoint me one bit.  


At first I was a little skeptical of whether the sweet subtleties of the peach would shine through, but due to the use of dehydrated peaches, the peach flavor was very prominent.  If you have trouble finding dehydrated peaches, I was able to find them at Target, in the store brand (Archer Farms) aisle, near the other packaged dried fruit.  I wouldn't recommend a substitution for this, because these are what give the cupcake its concentrated peach flavor.  


Peach Cupcakes
Print this recipe


Recipe from Week of Menus
Yield:  24 cupcakes

Ingredients:
For the cake:
1 cup (2 sticks) unsalted butter, softened
2 2/3 cups all purpose flour
2 1/2 tsp baking powder
1/2 tsp salt
2 cups granulated sugar
3 large eggs
1.75 oz (1 Archer Farms package) freeze dried peaches, pulverized in a mini food processor
3/4 cup low-fat buttermilk
1/2 cup pureed fresh peach
1 tsp pure vanilla extract

For the frosting:
1 cup (2 sticks) unsalted butter, softened
8 oz of cream cheese, softened
1.75 oz (1 Archer Farms package) freeze dried peaches, pulverized in a mini food processor
1 tsp vanilla extract
3-5 cups of confectioners sugar

Directions:
For the cake:
Preheat oven to 350 degrees.  Line cupcake tins with liners.  Mix together flour, baking powder, and salt.  Set aside.  In a large measuring cup or bowl, mix together buttermilk, peach puree, and vanilla extract.  Set aside until needed.  Using an electric mixer, beat butter and granulated sugar in a mixing bowl until pale, about 2 minutes.  Add eggs one at a time, mixing well after each addition.  Mix in pulverized peaches.  Mix in flour mixture in three batches, alternating with two batches of buttermilk mixture.  Mix until just combined, scraping down bowl as needed.

Scoop batter into cupcake tins.  Bake until golden brown and a toothpick inserted into center of cake comes out clean, about 21-24 minutes.  Allow cupcakes to cool in tins for 10 minutes, and then remove cupcakes and place them on a cooling rack.

For the frosting:
In a large mixing bowl, mix butter until it is softened and uniform.  Add cream cheese and beat together until it is uniform.  Add vanilla extract and mix.  Add pulverized peaches and mix.  Add 3 cups of sugar to the mixture and mix.  Add more sugar if necessary.  Mix again until mixture is creamy and spreadable.

Frost the cooled cupcakes with the cream cheese frosting, using a piping tip if desired.  Garnish the top of each cupcake with a thin slice of peach.

Note:

  • I used a Wilton 1M swirl tip to decorate these cupcakes
  • Pulverize the peaches right before adding to the batter and frosting, to prevent the peaches from absorbing moisture in the air.  

Friday, September 9, 2011

Shirley Temple Cupcakes


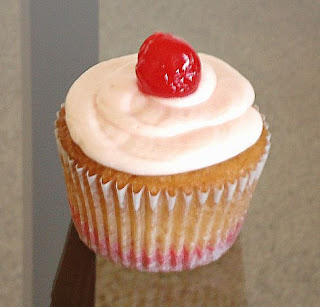
When I hear the words, "Shirley Temple," my mind does not refer to the child actress, famous for her singing and dancing (at least, not at first).  It immediately connects with the image of a maraschino cherry floating in a glass of 7-Up, dyed pink by the grenadine syrup and the cherry's sweet juice.  I remember ordering this drink at many family functions growing up.  My sister and I would excitedly ask my parents if we could order a Shirley Temple, and they usually obliged.  I loved sipping the sweet carbonated drink ever so slowly, so I could enjoy every drop of it.  Once I neared the bottom, I would carefully scoop out the cherry (the best part, of course) with my straw and after pulling off the stem, would enjoy every bite.  Although we're both much older now, I'm sure my sister would agree that Shirley Temples are still one of the best sweet drinks we could enjoy.  It has such a nostalgic feel, and ordering one makes me feel like a kid again!


I was lucky enough to find this recipe posted by Shanon of The Curvy Carrot.  This light, sweet cake made with marschino cherry juice and 7-Up is perfect, and the addition of almond extract really brings out the cherry flavor.  I absolutely loved the effect of the red cake on the bottom, which mimics the effect of the cherry juice in a Shirley Temple glass.  The cupcake is topped with a fluffy, cherry-flavored buttercream frosting and a marschino cherry.  The cherry on top completes the look--unfortunately, I was unable to find marschino cherries with stems, but I still think they look great without them.  I LOVE recipes that present well, and this one definitely does! 

FYI, the original recipe is actually gluten-free!  See original source link below.


Shirley Temple Cupcakes
Print this recipe

Recipe from The Curvy Carrot
Original recipe source Simply Gluten Free
Yield:  12 cupcakes

Ingredients:
For the cupcakes:
1 1/2 cups plus 1 Tbsp all-purpose flour
1 tsp baking powder
1/2 tsp sea salt
1/2 cup (1 stick) unsalted butter, at room temperature
1 cup granulated sugar
2 large eggs, at room temperature
1/2 cup Cherry 7-Up, at room temperature
1/2 tsp vanilla extract
1/2 tsp almond extract
1 Tbsp maraschino cherry juice
Red food coloring

For the buttercream frosting:
1/2 cup (1 stick) unsalted butter, at room temperature
Pinch of salt
2 1/2 cups powdered sugar
1/4 tsp vanilla extract
1/4 tsp almond extract
1 tsp fresh lemon juice
1 Tbsp maraschino cherry juice

For garnish:
12 maraschino cherries with stems

Directions:
For the cupcakes:
Preheat the oven to 350 degrees, and prepare a cupcake pan with your desired paper liners (I recommend using plain white, so the red color can show through). 

In a large bowl, whisk together 1 1/2 cups of flour, baking powder, and salt.  Set aside.

In the bowl of your standing mixer fitted with the paddle attachment, combine the butter and sugar together and beat, on medium-high speed, until fluffy, about 2-3 minutes.

Add the eggs, one at a time, mixing well after each addition.

Reduce the mixer speed to low, and alternate adding half of the flour mixture and half of the Cherry 7-Up, mixing well and scraping down the sides of the bowl as necessary.  Repeat until the flour and Cherry 7-Up are completely added to the batter. 

Add the vanilla and almond extracts, mixing well.

Place about 3/4 cup of the cupcake batter in a separate small bowl and add the remaining 1 Tbsp of flour, maraschino cherry juice, and red food coloring (to your desired tint). 

Evenly distribute the red cupcake batter among your prepared liners, about 1-2 tsp per cupcake, gently smoothing out the batter to make sure it is flat.

Once the red batter is in place, evenly distribute the remaining cupcake batter among the cupcake liners, making sure not to mix the two batters.

Bake for 15-20 minutes, or until a cake tester inserted in the middle comes out clean.  Let cool completely before frosting.

For the buttercream frosting:
In the bowl of your standing mixer fitted with the paddle attachment, cream the butter until light and fluffy, about 2-3 minutes.

Reduce the mixer speed to low and add the pinch of salt, powdered sugar, vanilla and almond extracts, lemon juice, and maraschino cherry juice, adding more powdered sugar as necessary for your desired piping consistency.

Pipe as desired onto your cooled cupcakes and garnish with a maraschino cherry.


Sunday, September 4, 2011

Twice-Baked Potatoes with Mushrooms and Prosciutto


I discovered this recipe yesterday while spending the day at home, watching The Food Network.  I probably wouldn't have been watching TV, except that Tony took the laptop to work with him yesterday because he had a fantasy football draft scheduled at noon (It's almost football season, so get ready for more game-day foods!).  So, I watched the "Football Weekend" episode of Giada at Home, and after watching her make these twice-baked potatoes, I was hooked...I had to make these ASAP and try them for myself!  I went to the grocery store soon after and picked up all the ingredients I needed, and made plans to cook them today.


The recipe was a relatively easy one.  The only thing to note is that it is a little time consuming, since the potatoes are being baked twice.  I'm usually not attracted to recipes that require a lot of time, but I have to say, this one is definitely worth it.  Plus, most of the time is just time spent waiting for the potatoes to cook in the oven rather than actual prep work, so it's not that bad.


This recipe is best described as a gourmet version of the typical twice-baked potato.  With the addition of the sauteed mushrooms and crispy prosciutto, it definitely takes the savory flavor to the next level!  The mushrooms give it a warm, comforting flavor that you don't usually get from your average baked potato.  I'll definitely have to save this recipe to make again during the winter!


Twice Baked Potatoes with Mushrooms and Prosciutto
Print this recipe

Recipe from Giada at Home - "Football Weekend" episode
Prep time:  12 minutes
Cook time:  1 hour 30 minutes
Difficulty:  Easy
Yield:  4 - 6 servings

Ingredients:
4 russett potatoes
3 Tbsp extra virgin olive oil, plus 3 Tbsp
1 small onion, chopped
8 ounces small mushrooms, such as cremini or button, sliced (I used cremini)
3 cloves garlic, minced
1/4 tsp kosher salt
1/4 tsp freshly ground black pepper
1 stick (1/2 cup) unsalted butter, melted
1 1/2 tsp dried oregano
2 cups (8 ounces) shredded extra-sharp cheddar
4 thin slices of prosciutto, halved
1/3 cups of chopped fresh flat-leaf parsley (optional)

Directions:
Preheat oven to 400 degrees F.  Line a baking sheet with parchment paper and set aside.

Using a fork, prick the skins of the potatoes all over and arrange on the prepared baking sheet.  Bake for 1 to 1 1/4 hours until tender and cooked through.  Remove from oven and let cool until warm enough to handle, about 20 minutes.

While the potatoes are cooling, in a medium skillet, heat 3 Tbsp of olive oil over medium high heat.  Add the onion and cook, stirring frequently, until soft, about 5 minutes.  Add the mushrooms, garlic, salt, and pepper.  Cook until the mushrooms are golden brown and most of the liquid has evaporated, about 6 minutes.  Put the mixture in a medium bowl.

Cut potatoes in half lengthwise and, using a small spoon, scoop out all but 1/4 inch of the flesh.  Add the potato flesh to the mushroom mixture.  Add the butter, oregano, and 1 cup of cheese.  Mix well, season with salt and pepper to taste.

Arrange the potato halves, cut side up, on baking sheet.  Brush both sides of the potatoes with the remaining 3 Tbsp of olive oil, and season the inside with salt and pepper, to taste.  Spoon the mushroom mixture into each potato half.  Arrange one half-piece of prosciutto on top and sprinkle with remaining cheese.

Bake until the cheese is melted and the prosciutto is crispy, about 20-25 minutes.  Remove from the oven, transfer to a serving platter, garnish with chopped parsley and serve.

Friday, September 2, 2011

Banana Caramel Cupcakes


Banana has always been a favorite flavor of mine.  Whether it's a banana milkshake, banana bread, banana split...you name it; if it has banana in it, I'm almost guaranteed to like it.  So when I saw this recipe on Annie's Eats I knew I would have to try it!  Well, after tasting this cupcake, I have to say that this is probably the most flavorful banana cupcake I've ever had!  Just the cupcake alone would be satisfying, but with the additional caramel buttercream frosting and caramel drizzle, this cupcake is simply amazing!  Let me warn you though, this recipe is NOT for a beginning baker.  As a beginner, the cake recipe is simple enough, but the frosting and homemade caramel requires a bit of experience.  If you do attempt the frosting, here's a tip:  BE PATIENT!  This frosting recipe requires a lot of beating, so if it starts to curdle after adding the butter, do not be alarmed.  Keep beating, and just when you think it's not going to turn out, the frosting will suddenly come together and result in a nice, thick, creamy frosting.  It might require a bit of effort to make, but this frosting complements the cupcake perfectly, and it's definitely worth it!

Banana Caramel Cupcakes
Print this recipe

Recipe from Annie's Eats
Yield:  about 30 - 36 cupcakes

Ingredients:
For the cupcakes:
2 1/2 cups all-purpose flour
1 Tbsp baking powder
1/2 tsp salt
12 Tbsp unsalted butter, at room temperature
2 1/2 cups granulated sugar
6 eggs
1 cup plus 2 Tbsp buttermilk
1 1/3 cups mashed ripe banana

For the caramel:
8 Tbsp unsalted butter
1/2 cup heavy cream
1 cup packed light brown sugar

For the frosting:
3 large egg whites, at room temperature
3/4 cup granulated sugar
Pinch of salt
16 Tbsp unsalted butter, cut into 1 Tbsp pieces, at room temperature

Directions:
To make the cupcakes:
Preheat the oven to 350 degrees.  Line cupcake pan with paper liners.  In a medium bowl, combine the flour, baking powder, and salt.  Whisk together and set aside.  In the bowl of a stand mixer, cream together the butter and sugar on medium-high speed until light and fluffy, about 2 minutes.  Reduce the mixer speed to medium-low and add in the eggs, one at a time, scraping down the sides of the bowl as needed.  Mix in the mashed bananas until well combined.  With the mixer on low speed, alternately add the dry ingredients and buttermilk, beginning and ending with the dry ingredients and mixing only until just incorporated.

Divide the batter between the prepared cupcake liners, filling each to about 2/3 to 3/4 full.  Bake until a toothpick inserted in the center comes out clean, about 20-22 minutes.  Allow to cool in the pan for about 5-10 minutes, then transfer to a wire rack to cool completely.

To make the caramel sauce:
Combine the butter, heavy cream, and brown sugar in a medium-sized saucepan over medium-high heat.  Bring the mixture to a boil, stirring constantly.  Once it reaches a boil, lower the heat to medium and continue to boil until the mixture is thickened, about 8 minutes.  Remove from heat and let cool.

To make the frosting:
Combine the egg whites and sugar in a large heatproof bowl set over a pot of simmering water (use a double-boiler if you have one).  Heat the mixture, whisking very frequently, until the sugar is completely dissolved and reaches 160 degrees (F) on an instant read thermometer.  Transfer the mixture to the clean, dry bowl of a stand mixer fitted with the whisk attachment.  Beat on medium-high speed until the mixture holds stiff peaks.  Reduce the speed to medium-low, add in the salt and begin adding the butter one piece at a time, beating well after each addition.  Stir in 1/2 cup of the cooled caramel sauce until well blended.

Frost the cooled cupcakes with the caramel buttercream, and drizzle with the remaining caramel sauce  FYI:  make sure your caramel is cool, or it will melt the frosting!  I learned this the hard way.  However, if your caramel sauce has cooled too much to be easily drizzled, heat for 10 seconds in the microwave and stir well to thin it a bit.

Notes:  
  • I used a Wilton 1M swirl tip to decorate the cupcakes pictured above.
  • I recommend using a plastic squeeze bottle to drizzle the caramel.  It makes the drizzling so easy, and the bottle can be heated in the microwave.  You can find them for about $1.99 at baking supply stores, or in the baking aisle of most craft stores.